Health & Fitness
ETextiles - Zooming in on the LilyPad
Making the Right Turn Biking Jacket using the LilyPad Arduino. I'm trying to link the hardware to the design. Sharing some random bits of useful information.


I'm trying to make the , and using the opportunity to learn some random things about circuit boards, schematics and, more specifically, the LilyPad. I'm sharing these as I learn, because it helps me to organize my thoughts and I hope that it helps you. I am including instructions in italics that will help you to follow along.
I've spent a fair amount of time looking at:
- the instructions for the Turn Signal Biking Jacket
- The schematics for the LilyPad Simple Board(open this in a new browser window or tab)
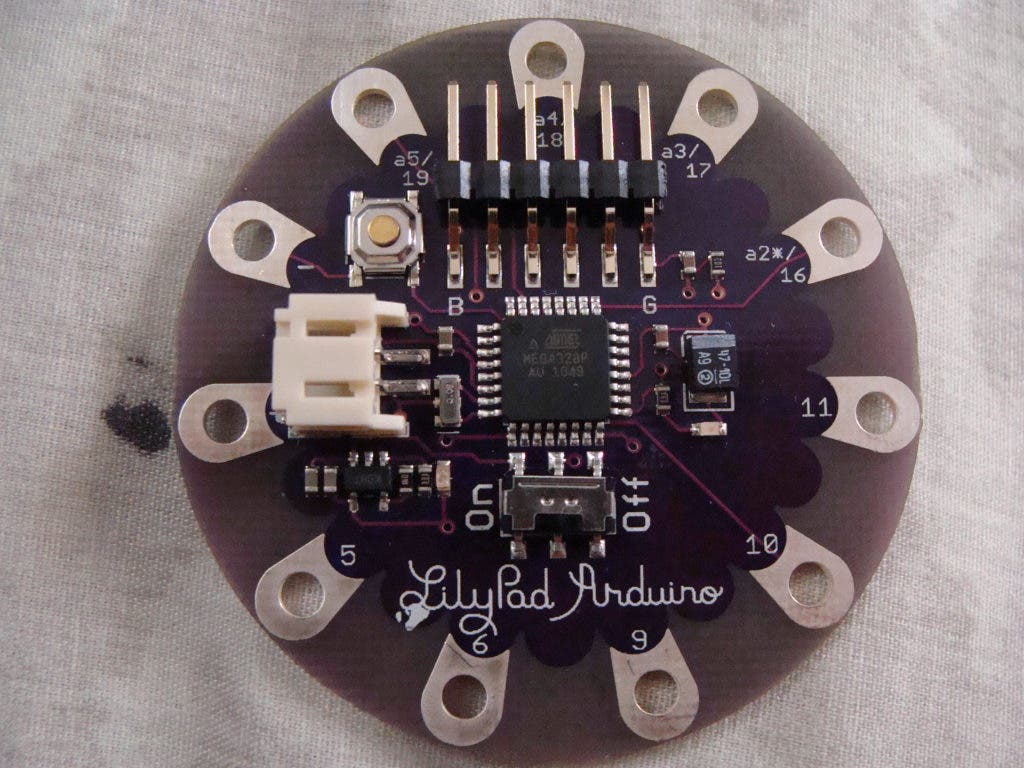
- The that I received in the ETextiles Beginner's Kit. (Open photo of the board in a new browser window or tab)
Find out what's happening in Belmont Shore-Naplesfor free with the latest updates from Patch.
Been confused, got some help, more confusion. Over time, I'm sure it will all make sense. All the little bits of information will come together into a complete picture.
Today I took a closer look at the LilyPad Simple Board. I've been trying to associate the diagram with the physical board. It's a simple task for those who know, but for me, it takes some time.
Find out what's happening in Belmont Shore-Naplesfor free with the latest updates from Patch.
Around the edge of the board are what I will call eyelets. They are used by sewing conductive thread over and over to secure the connection, then by writing some code in the Arduino software, downloading it to the board and running. The code will initiate electrical signals at the desired eyelets. The correct signals to the correct eyelets will cause the LEDs to light up.
The eyelets are numbered and the print is tiny, so I again used my Power of Asking for Help, and got another pair of eyes to read off the numbers on the board. Starting at the top, 18, 17, 16, 11, 10, 9, 6, 5, unlabelled, -, 19.
Hm... That's nice. I can associate some of them (5, 6, 9, 10, 11) to the labelled lines from the microprocessor, but some are confusing to me (16, 17, 18, 19).
So I AGAIN enlisted the Power and called Joe the Bro. We had some discussion about possibly a difference between the version of the board and the specification. Makes sense. Here's what I learned:
- If you can't really see what's on the board, take a high-resolution photo and blow it up on the computer.
- The microprocessor, which can be seen in the middle of the board, has 32 pinouts. Each pinout can support a separate simultaneous electrical signal. (Open the close-up of the microprocessor in a new window.)
- There is a dot or a curved corner of the microprocessor. To the left of that you will find Pin 1. Follow the edge counter-clockwise. Each succeeding pin is the next higher number. Pins 1-8 are on the left of the chip, pins 9-16 at the bottom, pins 17-24 at the right and pins 25-32 at the top. (Look at the close up of the microprocessor.)
- The symbol that looked like this: -C represents a trace that ends at one of the eyelets. (Look at the Simple Board Schematic)
- 16, 17, 18 and 19 have other markings. They are a2, a3, a4, a5. Look at the photo of the board. (AHA!!!! Now I can link them to the diagram)
- Communication is so very important (I'd asked for the numbers, and got them)
- The lines marked on the diagram with an a are address lines. They are used to direct a message to a specific component connected via the address lines. (Look at the Simple Board Schematic)
- The lines marked on the diagram with a d are data lines: They are used to send a message (data) to the component being addressed. (Look at the Simple Board Schematic)
- I need to pick up those glasses I ordered.
- I am reminded of The Power of Family
Cool! I think I'm ready to look at the Arduino software. I downloaded it some time ago, but really wanted to get to this point before I moved on.
Trish is very excited about her impending visit to the Bay Area Makerfaire in May.
Trish writes as for Patch and as Handmade Penguin for the Handmade Penguin blog