Arts & Entertainment
Anthony's Art Lessons: Learning to SEE the LIGHT
On your way to creating better photographs, you'll get there by "seeing the light." (And you can PARTICIPATE in the fun, online photo class assignment!)


When I started this lesson here, I knew I wanted to discuss the topic of "light." But as you can see, the word "light" can mean so many different things.
Light can be a physical property, like a source of illumination, such as sunlight. And light can be an object, as in a lamp. And light can be used as an adjective for things, like a light color (not dark), a light weight (not heavy), a light moment (funny), or even a light beer (less calories).
But LIGHT to a photographer is like words to a writer. As a matter of fact, the word "PHOTOGRAPHY," is based on Greek words meaning "drawing/writing with light."
Find out what's happening in North Hollywood-Toluca Lakefor free with the latest updates from Patch.
Understanding light... utilizing light creatively... is what makes one person with a camera an artist, and another person with a camera just... somebody with a camera.
And to use the writer analogy again, two writers may appear to do the same job, putting words onto a page. They may even be writing about the same thing. But upon closer evaluation, one tells a beautiful and engaging story, and the other just supplies your average common data in a textual form.
Find out what's happening in North Hollywood-Toluca Lakefor free with the latest updates from Patch.
Tell beautiful stories? Is that what we want to do with our cameras? Perhaps it is, and perhaps we should. But in all art forms, maybe our pursuit isn't always a story. Maybe we desire to convey a feeling. Or explain a meaning. Or not. Maybe we want to just discover beauty. No story. And we understand that beauty, is in the eyes of the beholder. Art is what you make of it.
So is it a story? An emotion? A meaning? Beauty? With camera in hand, what are we trying to capture? It could be all. It could be any. Or it could even be none.
None? Yes, none. "None" may represent a creative experiment that ends in failure. And to a true artist, failure is a good thing because it represents action. The artist tried out an idea, and learned that it did not work. Failure becomes a better understanding of an unfamiliar process or a new technique. So failure can represent knowledge. The artist has gained valuable experience that can be applied toward continuing a worthy endeavor.
Success isn't easy, but success isn't impossible.
But before you can go down the road to creating good art, the path to taking better pictures, you need to be well-prepared to make the journey. It's one thing to know your destination. But that's not the same thing as seeing where you're going.
You need to SEE the light.
Light is what makes or breaks a picture. A photographer who is skilled in "bathing" his/her subjects in attractive lighting will consistently engage viewers.
And when a photographer engages an audience, it's much like how a skillful writer keeps that book in your hands, makes you ponder the ideas, makes you react to the emotions. You are able to relate to the characters, because to you, they are alive. Even if they are only fictional. Even if they only exist on paper. To you, from the writer's own words, you are experiencing life... on pages that you keep turning.
That's excellent communication. The writer's words are speaking to YOU. And you are moved.
But it's not just words. It's the choice of words. It's the presentation.
Beginning photographers: just like there are many KINDS of words a writer can use, there are many KINDS of light a photographer can use. Study and understand light. Know "your light" just like a good writer finesses vocabulary.
Choose the right lighting, and it helps you COMMUNICATE your vision.
GO OUTSIDE AND EXPERIENCE NATURAL LIGHT.
The best way to study and understand light is to take a walk outside and experience the light from the sun. Sunlight is usually described as "natural light." Sunlight is also called "daylight," and the terms are mostly interchangeable. I won't go into it here as there is too much to explain, but much of the science of photography is based on "daylight."
For most of the hundred-or-so years consumer photography has been around, film (and now digital imagery) has been standardized on properties of daylight. Like color balance and exposure settings. Plus, the sun is a large source of illumination (but only when it's daytime!) and if you like traveling or enjoy the outdoors, you'll most likely want to study the effects of sunlight on your favorite subjects.
LOOK HOW SUNLIGHT STRIKES THE SURFACES OF OBJECTS.
Study the way sunlight hits different kinds of surfaces. Is the surface textured, smooth or reflective? What do the highlights and shadows look like? Is it overcast outside? What's the difference in light quality between direct sunlight and overcast skylight? What does my camera meter tell me in the different lighting situations? Can I translate this information into creative production?
Study the light. Take pictures to reference as examples. Take notes on your observations.
SOME OTHER FACTORS TO CONSIDER WITH LIGHTING:
Time of day, weather conditions (cloudy or overcast?), direction of light (front, side, or back?), angle of light (high or low in sky?), intensity, reflection (light bouncing off a surface onto the subject), surface texture of subject, indirect lighting (light from the northern sky), altitude (sea-level or in the mountains?), etc.
Again, there is so much to explain when it comes to just daylight, that we'll have to discuss these lighting issues on a continuing basis as they arise, for the lessons.
Studying and experimenting with sunlight is so easy to do, that's why we're talking about it here. But the great thing about working with sunlight, is that there are numerous factors that can change the QUALITY of light... all to YOUR creative advantage!
THE MOST IMPORTANT THING TO KNOW ABOUT LIGHT, WHEN YOU ARE TRYING TO MAKE ART.
Again, seriously study the many effects of the lighting and the light sources around you so you will begin to learn the different qualities of light. And once you do that, ask yourself:
HOW DOES THIS LIGHT MAKE ME FEEL?
HOW CAN I USE THIS TYPE OF LIGHT TO COMMUNICATE MY THOUGHTS AND MY FEELINGS?
Then continue to ask yourself these things, whenever you have your camera in your hand.
LOOK AT THE PHOTOS (included in this article), READ THE INCLUDED CAPTIONS.
The PHOTOS and the CAPTIONS will help you understand some specific QUALITIES OF LIGHT, and how this light works on the subjects in the photographs.
NOW, HERE'S THE PHOTO ASSIGNMENT.
A very EASY assignment, but please follow the directions.
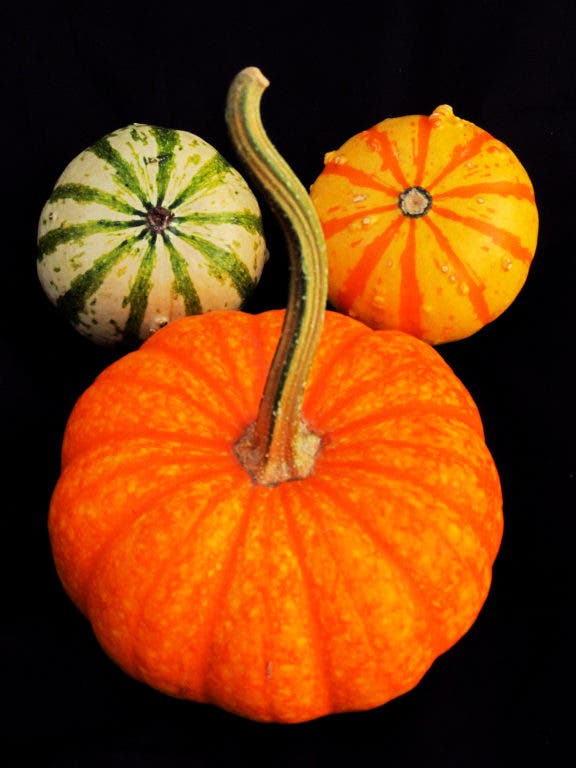
1. Select THREE (3) OBJECTS that are the size of a standard APPLE or ORANGE.
You can use whatever items you have laying around, even fruits or gourds like I used. Be creative in your selection, but keep the objects to the requested size. Note: Objects too small are really hard to light or photograph (a lot has to do with the technical limitations of your camera), and too large items will be too cumbersome to pose or move around for effective lighting and effortless composition.
2, USE A SIMPLE, SINGLE COLOR BACKDROP.
I used a black bedsheet that cost very little, only $5. (Actually the group of gourds cost me 3 times more than the single bedsheet, and I found out that I could have bought better-looking gourds at the supermarket for less than $15.) You can use any kind of fabric or color background, just don't use a busy printed pattern, as it most likely will be distracting.
3. USE ONLY OUTDOOR SUNLIGHT as your LIGHT SOURCE.
You can shoot on your porch, in your backyard, at your local park. Use whatever QUALITY OF LIGHT that you find AESTHETICALLY PLEASING TO YOU. It could be direct sunlight, overcast lighting, "magic light" (SEE PHOTOS AND CAPTIONS!), light you bounced off a reflector, or light in the shade under a tree. Just USE NATURAL LIGHT (outdoor sunlight) and use adjustments on your camera to get the exposures you like.
4. TRY DIFFERENT COMPOSITIONS AND LIGHTING, USING THE 3 OBJECTS ON THE SIMPLE BACKGROUND.
Experiment and see what your camera is capable of doing, and really challenge yourself to create artistic pictures. This sort of exercise is called "STILL-LIFE IMAGERY" and is actively practiced by disciplined artists (photographers, painters and illustrators alike) even today.
5. SEND IN 3 OF YOUR BEST PHOTOS FROM THE SESSION.
Look through your work and choose the BEST ONES that "speak" to you. Don't ask opinions from your friends or family on your photos- you want to develop your OWN SENSE of artistic style, so use this opportunity to learn how YOU see the world! Along with each photo, put some information about the lighting and the time of day, plus any other CAMERA DATA your camera may give you (very helpful). You may also give brief input about your images.
send your JPEG pictures (the assignment photos) to: buzzpuppy.com @gmail.com
make sure you LABEL EACH DIFFERENT PHOTO with your NAME in the title. (so I know its your photo!)
I'll post a selection of the assignment submissions, and make some comments on the work for contructive learning.
I have a few submissions from readers, and I would like to include those in my next article, after I get a few more submissions, so I can do a lesson that focuses on READER PHOTOS!
THANKS FOR SHARING AND PARTICIPATING!
Anthony