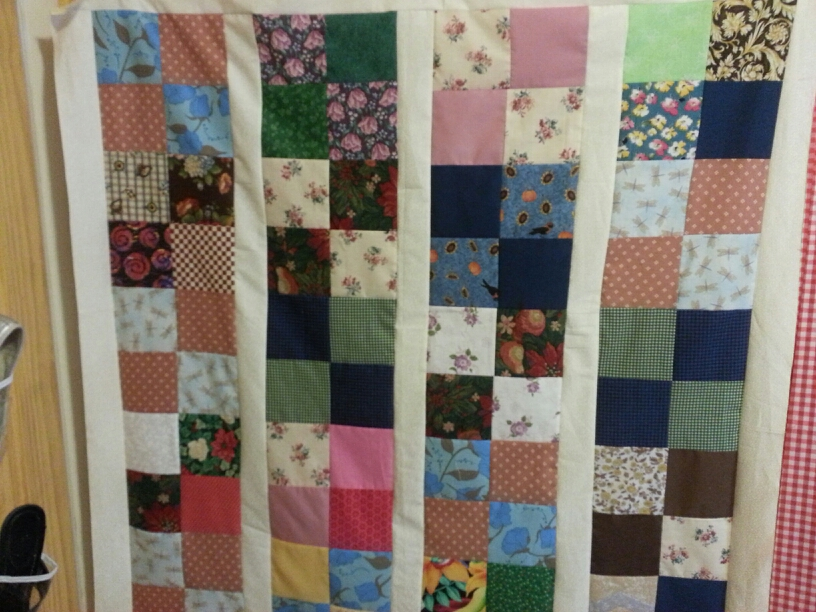
To all you quilters out there, hopefully you now have a completed quilt top that is ready for batting and backing. Many quilters do not think this is fun and they tend to stall out after the top is made. I happen to like the batting/backing and finishing process – it means you are in the home stretch of your one of a kind quilt creation!
Measure your quilt top from side to side and top to bottom. You will be using those measurements to cut your backing and batting pieces
.For the backing, you want to use good quality muslin or 100% cotton. Bear in mind that most quilting cottons are 42-44” wide. Usually this means that you will need to sew two pieces together to get the width you need (for example, if your quilt top is 60” wide, then you will need a piece of 42-44” material with the selvage trimmed off, a 1/4 inch added for your seam allowance, and cut to the length of your quilt top, plus another piece that is 18-20 inches, again with the selvage trimmed off and a ¼ inch seam allowance. Make sure that the final width and length of your backing is 1 inch larger than your quilt top.
Many backing muslins also come in wider widths, so you can purchase a 90 inch wide backing and cut to size (again, remember that the back length and width needs to be 1 inch wider than the quilt top). The extra fabric won’t go to waste because you can use it as the quilt binding.
You will need to do the same thing for your batting. The good news is that if you must piece the batting, you can simply butt the edges together and either use a wide zigzag on your machine to join them, or whip stich them together by hand. You don’t need to be picky about this as long as you don’t overlap the edges, which can leave a ridge. For your batting, use either 80/20 cotton batting or 100% cotton batting. Try to avoid polyester batting – it does not lay well and it is difficult to work with.
Now either find a big table (like your dining room table) or the floor. Place your backing on the surface of the table or floor and smooth out the wrinkles. Place your batting on top of the backing and smooth out the wrinkles. Place your quilt top on the batting, making sure that you have about 1 inch on all sides. Smooth out the wrinkles.
Pin all the layers together around the edges of the quilt top. If you are comfortable, you can also use basting spray. I find that the combination of pins and static cling keep the layers together but some quilters like that extra security.
If you know how to do free motion quilting on your machine or if you have a walking foot, go ahead and quilt as desired. If you don’t there is no reason to worry. Get an embroidery needle (these have a large eye). Take some embroidery floss and separate out 2 strands, about 12 inches long. Thread your needle and at every intersection of a quilt square, push your needle down from the top, leaving about a 4” tail, and come up from the bottom, close to where you went in. Double knot and cut off the tails to about a ½ inch. This method binds the quilt top to the layers and looks pretty nice.
Once the quilt is quilted or tied together, you need to bind it. I personally like to hand bind although many quilters find it tedious. To do this, cut 4 inch wide strips in the color of your choice, or use the leftovers from your backing fabric. Cut enough strips to go around the edges of the quilt, plus about 5 inches extra (so for a 60” x 60” quilt, you would need 240 inches plus 5 inches). You will have to piece the strips together – the quickest way is to simply sew them right sides together, using about a ¼ inch seam allowance. You can also piece on the diagonal, which is a bit stronger. Google ‘how to piece binding strips’ – there are a lot of good tutorials out there by Connecting Threads, Missouri Star, About.com, etc.
Once you have your binding pieced, fold in half lengthwise and iron.Trim off the excess batting and backing from around your quilt. Leave about a ¼ inch on all sides.There is an excellent set of directions for biding your quilt at About.com/Quilting. Here is the link:
http://quilting.about.com/od/bindingaquilt/ss/mitered_binding.htm
The author provides very easy instructions and pictures. One point to clarify – when you are sewing the binding to the back of your quilt, I would recommend sewing it by hand, using any standard hemming stitch. Some quilters do a ‘stitch in the ditch’ but you have to be really careful to be sure you catch the binding on the back, and it leaves a little flap on the back which I don’t think is attractive. But it is fast, so it really depends on what you want.
Using a permanent fabric marker, sign and date the quilt on the back side. You can also add washing instructions (most quilts are machine wash and dry – good for baby quilts!)
And that’s it! Post photos, show your friends and neighbors, and admire your work – a truly one of a kind object that can’t be bought in a store.
If you have questions, just post them in the Comments box. Have fun!