I have been taking advantage of some time spent at home by catching up on various quilting projects. One project on my list was to create a quilt for a baby girl. I decided to do something a little different than the traditional panels or block patterns. This one is very easy to make and can be sewn in a weekend!
I started with something called a ‘jelly roll’. Jelly rolls are 2.5” x 42” strips, usually 20 to a roll. They are neat because each strip is from the same family of fabrics, which eliminates the need to plan the color scheme. Jelly rolls are convenient because many items can be created with a 2.5” strip, and the strips can be cut into 2.5” squares if you are planning a quilt that is more ‘patchworky’.
I took my jelly roll and augmented it with some additional fabrics from my stash, more because I wanted a repeating pattern. You will also need a solid or tone on tone fabric. You will need to cut 5 strips 6.5” by 42/44”.
Find out what's happening in North Branfordfor free with the latest updates from Patch.
To make this is simple:
Take 13 jelly roll strips and sew them to each other. I usually sew in sets of 2, then sew 2 sets together, and so on. Press all seams to one side in the same direction.
Find out what's happening in North Branfordfor free with the latest updates from Patch.
Take 7 jelly roll strips and sew them to each other. You now have 2 panels, one with 13 strips and the other with 7 strips. Each panel is 42/44”.
Measure 28” up each panel and cut each panel across the strips. You will now have a 13 strip panel that is 28” long and a 13 strip panel that is 14” long. You will also have a 7 strip panel that is 28” long and a 7 strip panel that is 14” long.
Take one of the solid 6.5” strips, cut it to 28” and sew to the right side of the 13 strip 28” panel. Sew the 7 strip 28” panel to the right side of the solid 6.5” strip.
Take one of the solid 6.5” strips, cut it to 14” and sew to the right side of the 13 strip 14” panel. Sew the 7 strip 14” panel to the right side of the solid 6.5” strip.
You now have 2 panels again.
Take another 6.5” by 42/44” strip and cut it to 32.5”. This should be the width of the 13 strip panel. Double check by measuring and adjust if needed.
Cut a 6.5” x 6.5” square. Sew the square to the right side of the 32.5” strip.
Take another 6.5” by 42/44” strip and cut it to 17.5”. This should be the width of the 7 strip panel. Double check by measuring and adjust if needed. Sew to the right side of the square. Press seams to one side.
This looks a bit odd, but the square prevents an odd seam in the 6.5” strip
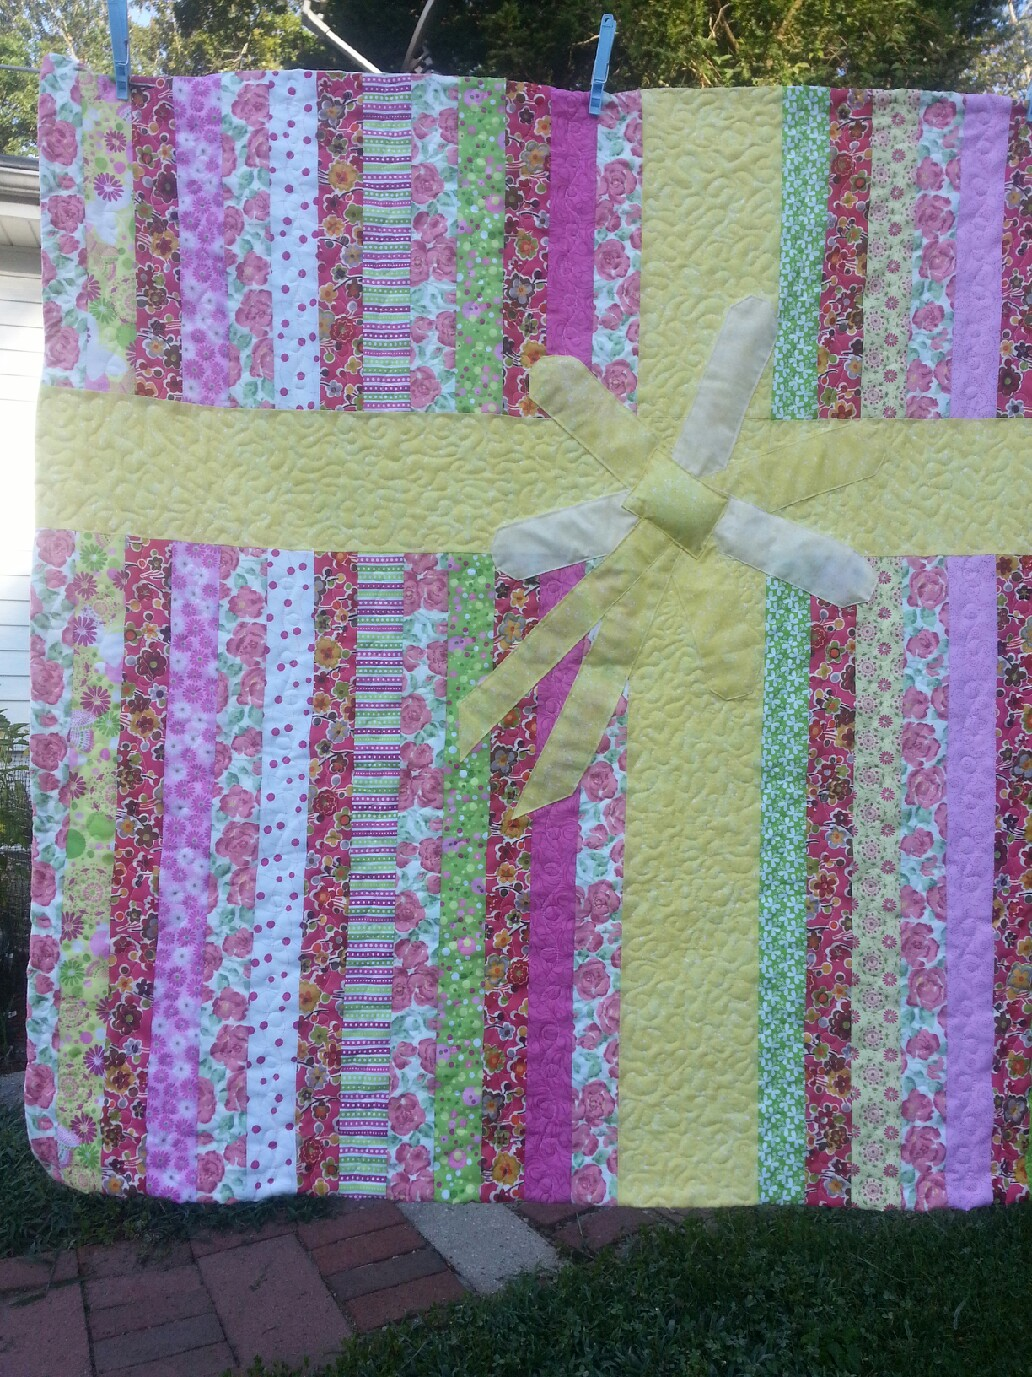
Sew the pieced 6.5” strip to the top of the 28” long panel. Sew the 14” panel to the top of the 6.5” strip. You should now have a pieced top that looks like a gift wrapped package.
The bow is a bit challenging but can be done easily if you are careful. The easiest way is to cut 6 strips about 3” x 10”. Starch each strip heavily with spray starch and turn the raw edges under about ¼” or so. You can round the top of the strip if you like. Arrange them with the raw ends meeting in the pieced 6.5” square and pin to the quilt top.
Take 2 more strips, about 3” by 12”, and repeat the above to make the bow ribbons. Angle the bottoms of the strips so they look like they have been cut on a diagonal. Pin to the quilt top with the raw ends meeting in the pieced 6.5” square.
Topstitch the strips to the quilt top (topstitching is nothing more than sewing close to the edge).
The last thing you need to do is cut a square of the solid fabric that is wide enough to cover the raw ends of the bow strips that meet in the center. Starch the square, fold under and topstitch down.
You are now ready to sandwich your quilt top with batting and backing.
Once the quilt is sandwiched, the quilting is easy. I kind of doodled circles down the center of each strip, but you can sew a straight line down the center of each strip, or stitch in the ditch (sew along the seam lines) if you like. Don’t do too much quilting – you don’t want it stiff. I deliberately did not quilt the bow as I wanted the background quilting to make the bow stand out.
Bind your quilt, wash and dry, and thrill a new mom!