Health & Fitness
How to Take Great Photos When it's Cloudy
No sun? No problem! Here are photography tips and tricks from a local photographer.
Florida is a beautiful state—one of the premier destinations for a summer filled with wonderful scenery and places for families and friends to visit, enjoy each other and make some timeless memories.
However, when dealing with Florida's beauty, you also have to deal with Florida's weather, which may not always seem as beautiful. Especially for taking photos during these summer excursions.
I can give you a few tips to make sure that when you are dealing with these overcast and cloudy days, your pictures still come out beautiful!
Find out what's happening in Temple Terracefor free with the latest updates from Patch.
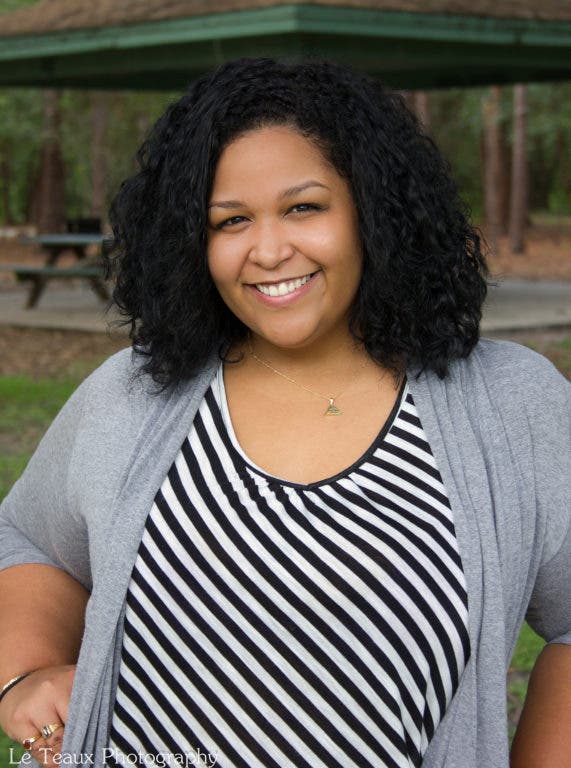
The particular portrait I am using for this is of one of my best friends Daianna. She was kind enough to accompany me to Takhoma Trail Park right after the rain, braving the mosquitos to get a beautiful shot!
I do have a DSLR camera, but that doesn't mean that a wonderful memory cannot be created from a point and shoot! (And even though we are all digital, I encourage you all to have your photos PRINTED. That way you can enjoy them away from electricity!)
Find out what's happening in Temple Terracefor free with the latest updates from Patch.
Taking a good photo in these conditions is going to take a combination of controlling your camera's settings and where you position yourself and your subject in relation to the light of the sky.
Now, the first thing we can talk about is positioning. On an overcast day, even a cloudy day, there is still light, it is still day. You can take advantage of this in two ways:
1) No direct sunlight means no shadow. Placing your subject under a large tree, awning or covering of some kind, almost out of the "shade," will allow the light that is being shown that day to naturally bounce off of the exposed grass or concrete directly in front of the subject, creating a nicely lit portrait, without spotty shadows on the subject's face.
2) If no covering or tree is available to create this environment, then your camera settings can come into play. There is a control that most cameras have, even if they do not have a manual mode, and that control is called ISO. The ISO simply means the sensitivity your camera sensor has to the light around it. The higher the ISO, the more sensitive the sensor is to the light around it, the brighter the photo. If you do not know where the ISO option is on your particular model, read your manual or visit the website of the manufacturer. Any time I get a new camera or piece of equipment, I save myself a lot of headaches by checking that out first!
When using option 2, I suggest you have your subject turn slightly away from the direct exposure of the sky to the face to avoid shadows created by the nose and eyelid on the face.
Here is a result of using a combination of 1, having my subject under a tree right where the light ended and the "shade" began, and placing my ISO at 400, at a regular exposure most point and shoots will automatically pick for the circumstances.
Hope you all enjoyed my first blog and find that these tips help you out!
In my next blog, I will be touching on photography of objects and plant life.
Until then, keep snapping!
Brianna Baxter is a Temple Terrace resident and freelance photographer who takes pictures of everything from family and personal portraits, advertising fashion, model headshots, weddings, outdoor parties and events. You can check out her Facebook page or Flickr gallery and email her at leteauxphotography@gmail.com.