Neighbor News
Perfect Mailbox Installations
Now that spring is on the horizon, it's time to spruce up your curb by replacing that tattered leaning mailbox! We'll show you how!

Now that winter is coming to an end, it's not unusual for the community's curbside mailboxes to be leaning, broken or just plain old worn out. Damage to mailboxes and posts does not only happen due to impact from snow plows or errant drivers, but the weight of the snow from the snow plows can cause leaning or breakage as well.
Mailbox posts rot out and become soft at ground level because you have three elements, water, oxygen and organic material. This holds true even if you have one of those higher end aluminum posts or a Rubbermaid plastic assembly as they generally slide over a 4x4 wooden post into the ground. This makes them loose in the ground and compromises their strength when the post office opens and closes the door on the mailbox.
First do a visual and manual inspection:
Find out what's happening in Wheatonfor free with the latest updates from Patch.
Is the mailbox post loose or wobbly?
Is the arm holding the box loose or wobbly?
Find out what's happening in Wheatonfor free with the latest updates from Patch.
Can you take a blade screwdriver or butter knife and penetrate the surface of the wood at ground level easily?
If the answer to any of these questions is "yes", then it's probably time to replace or repair your mailbox post.
If you're a "Do it your selfer" then here are some guidelines for trouble free replacement of your mailbox post.
STEP ONE
ALWAYS and I mean ALWAYS call JULIE (dial 811) for utility marking prior to digging in your parkway. Even if you plan to put your post in the same location! You'd be surprised at what is under the ground in front of your house. It's free to contact them and if you cut a cable or a gas line without contacting them, you could be liable for the repairs. Often your mailbox post was placed incorrectly (too close to the curb) in the first place which may have contributed to the damage. Also, if you go with a different style or size of mailbox, you will have to set your post further or closer to the street than the original. I repeat, ALWAYS call JULIE to mark the utilities, after all, it's the law.
STEP TWO
Once your parkway is marked up by JULIE, you need to determine exact placement of your post. The USPS has published guidelines for the front lip of the mailbox to be set back from the curb, usually 6" to 8". This setback is so that when someone leaves your mailbox door open, it does not protrude onto the street causing accidents or injuries to drivers. It also keeps it from getting knocked off. I generally set a new mailbox on the parkway with the door fully open to the back edge of the curb, and dig my post hole behind the mailbox unless it is one that mounts on the side of the post, in which case, my hole will be dug towards the middle of the mailbox. Dig your hole no less than 24" (2 feet) deep so it is below the typical frost line for our region. This keeps the ground water from freezing and heaving up your post in the years to come. Below is an image of the US Postal Service guidelines for placement, hole depth and height of your mailbox post.

STEP THREE
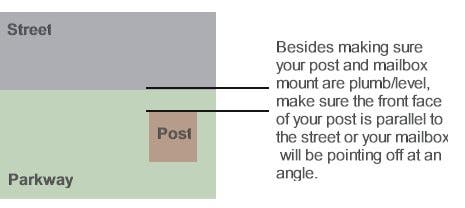
Place your wooden post into the hole, if you are using a post that slides over a wooden post, your wooden post should be 4' to 5' long (read the directions that came with your post assembly!) and if it is a premade wooden assembly it should protrude from the ground so your mailbox mount is 41" to 45" above the ground. Some prefabricated wooden mailbox posts are too long and may have to be cut down to size and if they are too short, you may have to put some dirt back into your hole and compromise the strength of your installation. I generally put some nails around the sides of the post where it will be under the ground to help with leveling once cement is added. It also helps hold your post into the cement if the cement splits later under the ground. You will need about 2-3 quarts of water and a sack of fast setting concrete to set your post. Fast setting concrete can be mixed directly in the hole with a stick. I usually add some water to the hole, pour some dry concrete into the hole (about 1/2 of a bag), then add a little more water. Then I whip out the level making sure the post is level before tamping and stirring the cement in the hole. Be sure that the front face of your mailbox post is parallel with the street or your new mailbox will sit at an odd angle to the street (see diagram below). Keep adding cement and water and stirring, make sure the mix is not too soupy, and keep checking the level of the post as you go. Don't worry if all the cement does not get completely mixed with water, as ground moisture will activate whatever cement is left dry. Allow 15-20 minutes for the cement to dry, several hours if you did not use a fast-setting mix. Once the cement has begun to set, you can use some of the dirt you dug out to back fill the hole. Tamp the dirt down with a board and a hammer to minimize settling, and continue to check the level of your post during the process.
STEP FOUR
Now that your post is set, if you have a sleeve over style post, follow the manufacturer's directions for assembly. If you are installing a traditional curbside mailbox, you will need to install your mailbox mount on the extended arm of the mailbox. Be sure to center the mount on the arm, and leave a small space at the post side to accommodate the rear lip of the new mailbox. Now install your mailbox on the mount, again making sure it is centered on the post and level.
STEP FIVE
Now that your mailbox and post assembly is complete, the only thing left is to install your address numbers as required by the post office and as an aid to any possible emergency responders or guests finding your house.
Ta' Da'!
Yes, I know this is very boring material, and to be honest, installing a mailbox is very hard work if you are not accustomed to doing so or if you don't have the proper digging tools, power drills and saws.
The good news is you don't have to go through all this effort to install a new mailbox for your home!
Just pick up the telephone and call MailboxFast.com at 630-215-7343 and let us take care of everything from a free evaluation of your mailbox post condition to building something custom for you or installing a store purchased mailbox. We also take care of contacting the utility companies to simplify the process.
Sometimes your mailbox and post do not require replacement and we can repair them for you to save some money.
The most perfect mailbox installation is one that requires very little effort on your behalf! Call 630-215-7343 now or visit MailboxFast.com to schedule your "Perfect Mailbox Installation!"