Health & Fitness
BLOG: Trenching Your Tomatoes
Today we'll learn about a great method for planting your transplants so that more roots will grow and will absorb more nutrients. It's called trenching.

NOTE: I forgot to mention in my last post that the two biggest causes of blossom-end rot, where your tomato starts to turn brown and rot, are not enough calcium and uneven watering. SO before you even THINK of planting, you may want to add calcium to the area as early in the season as possible. The easiest way to do this is by sprinkling powdered milk where you intend to plant your tomatoes. You need to do this well in advance because it takes a long time for the soil to “process” the calcium into a form that the tomato plant can use.
This week we’re going to learn about a great technique for planting your tomatoes in your Square Foot Garden (or whatever method you use) so they can get the most nutrients from the Mel’s Mix (soil-less mix made from 1/3 peat moss, 1/3 vermiculite and 1/3 blended compost—) and anchor the plant even better. It is called “trenching” and is easy to do. By the way, I’ve just learned about coconut coir (also called coco coir or coco dust) that is a suitable substitute for peat moss in your .
In my last post we talked about pruning your tomato of suckers, but there were a couple of “hints” I didn’t mention. Although it is best to prune when the suckers are very small, if you’ve waited too long to prune the sucker growth, you’ll notice that it has started to look like a separate tomato plant ... and it IS! You can take that large sucker that you’ve pruned and plant it for a late crop of tomatoes! All you need to do is set it in a glass of water and transplant it when roots start to form.
Find out what's happening in Glen Burniefor free with the latest updates from Patch.
Pruning of sucker growth should be done weekly. In addition to pruning sucker growth you should remove any stems where the leaves start to yellow. As we talked about in the last post, these are leaves that are using more sugar than they are producing and only serve to drain energy that can go into the fruits. While you’re out in your garden checking for sucker growth you should also make sure your tomatoes are going up your vertical support. If you use nylon mesh it will be very easy to “weave” the tender top in and out the net. This is also a great time to inspect for insect damage and disease. You can hand pick off any caterpillars you find as they can cause a great deal of damage.
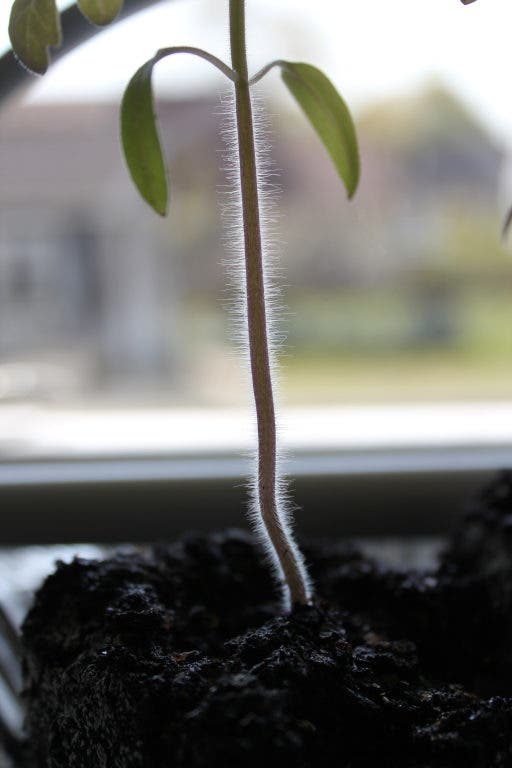
Now back to trenching, or as Mel Bartholomew the inventor of the Square Foot Gardening method calls it, the “lay-me-down” method. If you look at the photo of the tomato plant, you’ll notice thousands of little “hairs” all along the stem. Each one of these hairs is a potential root.
Find out what's happening in Glen Burniefor free with the latest updates from Patch.
This is good news if your transplants are “leggy” (tall and spindly with only a few leaves at the top of the plant). If your transplants are NOT leggy all you need to do is remove the lower leaves with a sharp knife or pruners. In either situation, keep about 5 leaves at the top of the stem.
If you’re using the Square Foot Gardening (SFG) method, you will plant your tomato transplant in one square foot—yes, that’s all the room it needs—and remember, we only use 6” of Mel’s Mix! Dig a deep hole in one corner and a shallower trench toward the center of the square. HINT: If you’re going to plant more than one tomato you will want to be consistent as to which corner to place the root ball. This will make it easier to know where to water if you use the hand watering method.
Place the root ball in the deeper hole in the corner and lay the stem in the shallower trench toward the center. If the transplant is young, you will want to slip a cutworm collar over it and bury part underground and have part above ground. I would also suggest you do this if you start your tomatoes from seed directly in the garden. If you’ve ever planted a young tomato only to find the top sheared from the stem and laying on the ground, you’ve been the victim of a cutworm. If you’ve ever dug in your soil and found a “C”-shaped critter about the size of a penny, this is probably a cutworm. It is the larvae of a moth, and despite the name cutworm, it is a really a caterpillar.
Cover the root ball and stem with Mel’s Mix (or soil if you don’t use the SFG method), gently pat down so that the soil comes in contact all along the root and stem and water well. If you hand water, you will only need to water the corner with the root ball and along the trench. I also add water to the inside of the cutworm collar—which was simply made from section of the cardboard core of a paper towel roll.
You’ll notice that the plant initially points at an angle, but in just a few days it will straighten up all by itself. If you don’t use a cutworm collar, you can put a little soil to gently guide the shoot upward.
Now that you’ve trench planted your tomatoes, all those little “hairs” will form roots and really anchor your plant in the ground. And since there are so many more roots, they will absorb even more nutrients from your Mel’s Mix. This is why the mix is made using one-third high-quality blended compost. These roots are also closer to soil-level which is warmer—and you know how tomatoes love heat. If you’re concerned that it’s TOO hot, you can always add mulch.
What types of tomatoes are you planting this year? I’m going with Sun Cherry and then planting a heirloom mix so it will be a complete surprise to see what I get.
My next SFG Class will be in Glen Burnie on Saturday, April 21, 2012. SFG 101 10 a.m.-noon and SFG 201 1–3 p.m. Register or contact me online at sfg4u.com. Class size is limited to 10 people so register early.