


Rain Barrel Supplement: This blog is an extension of my , Cedarwood Gardens Twenty-Twelve as it would have made the first much too long.
Speaking of which, this project took me a lot longer than I anticipated although once I started the project I had it completed very quickly.
First and foremost, I have seen many designs for rain barrels in stores and on the interweb but found that I did not like any of them. Most units I saw were usually overpriced, perhaps because they looked pretty, but they had limited capacity and could not be connected to additional units. Some of the others I had seen were simply Do-It-Yourself designs that also did not allow for expansion, looked cheap or made with cheap “barrels” and in many cases were sold at inflated prices - $100+. The route I took was relatively inexpensive, easy to construct, and can be expanded infinitely.
My project started simply enough with the purchase of two 55 gallon blue barrels. As former soap containers, they did require a minimal amount of cleaning before use. COST: $20 total.
(The price appears to have gone up since I purchased mine back in 2010)
Excited to have my rain barrels, I was ready to lay out my plan of action but was stonewalled by the lack of information I was finding. The designs I did find I did not like and it was becoming clear, at least to me, that there was no industry standard. So after all the excitement of having my barrels, I did nothing with them till the following year.
Find out what's happening in Lakewoodfor free with the latest updates from Patch.
With the onset of spring 2011 I was itching to get moving on the garden and with no “hands in the dirt” work to do I was able to dedicate my time to the construction of my rain barrels. Having begun my quest for functioning rain barrels anew, I started to make routine trips to Home Depot, Lakewood Hardware and Lakewood Garden Center. Between the three stores, most notably Lakewood Hardware and Lakewood Garden Center, I finally started to formulate a plan.
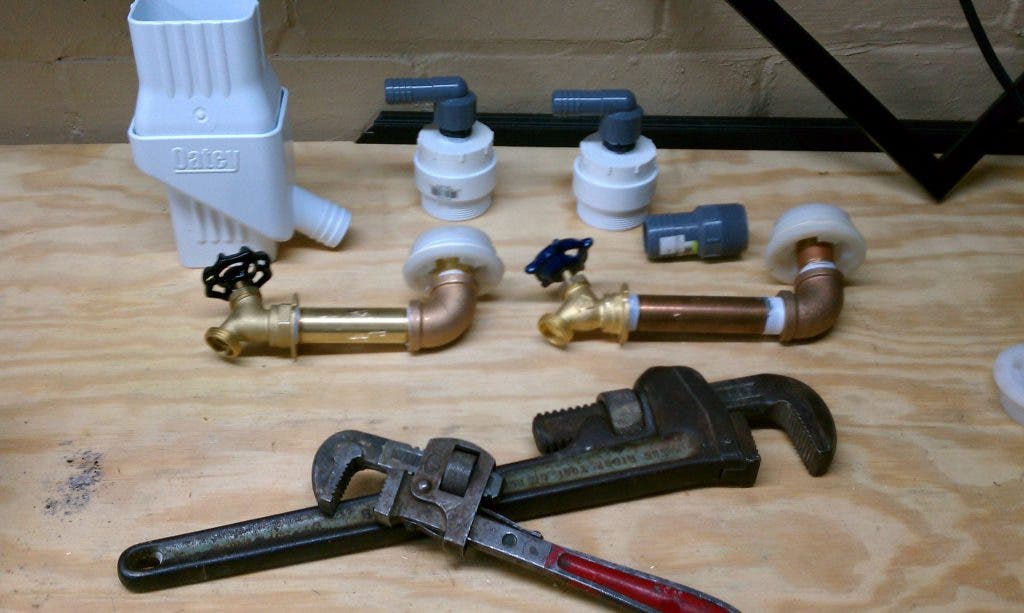
Aside from the barrels themselves, one of the most important pieces to this puzzle would be the rain water diverter. I purchased the Oatey diverter from Home Depot for around $20. What I really like about this unit is that Oatey is an Ohio based company and in my opinion is sold at a great price.
Find out what's happening in Lakewoodfor free with the latest updates from Patch.
With those two items out of the way it was time to move on to the movement of water into and out of the barrel. Though I have mentioned already, I have not spoke about Glenn who I need to give an immense amount of credit to. Glenn was instrumental in all aspects of this project and I don’t feel I would have had nearly as much success without his input.
With Glenn’s help, we were able to fashion together a system that allowed me to connect as many blue barrels together as I wanted as he taught me what hydrostatic pressure is.
It simply means that, with the barrels connected together, they will both fill up equally without any complicated engineering. I was not much of a science guy so this really amazed. It is also great because I have plans to expand from my current system to 6 barrels - holding upwards of 300 gallons of water.
From here, once we figured out what parts were needed and how we wanted it all to fit together, we formulated our plan which goes as follows:
- Required the barrels be situated upside down so that the existing ports were located at the bottom.
- Raise the barrels off the ground to keep the valves protected while adding some additional gravitational forces as well.
- Connect the two barrels with a hose to utilize the extra capacity (requires the PVC components).
- Assemble valve assemblies with off the shelf copper pipes.
- Cut a section of my gutter out to install the rain water diverter.
- Drill a small hole in the top of one barrel to receive the rain water.
It all seemed so simple now and since we had it all figured out it was just a matter of an hour or two of work to finish off all of the work.
Ironically, while I was finishing up this post I received my most recent issue of Urban Farm Magazine which has a 3 page How-To on creating a very inexpensive rain barrel our of garbage cans. I will be happy to share the article with any of you as well as the design I used for mine, just shoot me a message and we can exchange emails.
A final note is that the total cost of this project was well under $100.00 The greatest expense for me was the copper pipes and valves which, in total, cost about $25 each. Another $20 for the barrels, $20 for the diverter and a few dollars for a few feet of hose and a handful of PVC pipe fittings.
A word of advice for those looking for a how-to:
It is highly recommend to view the photos for the best description as my words may not be as clear as I would like them to be. Also, read the comments below the photos for additional detail.