Health & Fitness
How to Play the Bowling Green Golf Club Front Nine Like the Members Do
Bowling Green Golf Club talks about local knowledge tips to play the course like the members do.


Are you familiar with the ins and outs of playing Bowling Green Golf Club? As with any golf course, there are secret strategies, which are only revealed when one plays the course regularly. These strategies many not be obvious to the first time visitor. Golfers refer to these strategies as Local Knowledge and today we are sharing some of these tips to make your first round at Bowling Green even more enjoyable.
HOLE 1
The opening hole at Bowling Green in scenic northern New Jersey is an inviting downhill opener with beautiful views of the surrounding hills and Bowling Green Mountain. It is a short Par 4 that can ease you into your round; however, there are a few subtleties that can trip you up. One in particular is how much the green breaks. The reality is the first green breaks about half as much as is perceived.
Find out what's happening in Jeffersonfor free with the latest updates from Patch.
A subtlety of the first hole is the positioning of the tee shot. The fairway narrows to 15 yards wide at the 100-yard marker and the down slope of the fairway to the green begins at this point. The fairway bunker begins at 105 yards to the green center. A large oak tree blocks a second shot from the right rough.
As you approach the putting green you will see that it’s pitched from back to front so putting uphill from below the hole is the best place to be. Here is the deception; the two opposite slopes (the fairway down to the green and the green from back to front) can play tricks with your read.
Find out what's happening in Jeffersonfor free with the latest updates from Patch.
The ideal opening tee shot is in the left center of the fairway leaving 115 yards to the center of the green. From here you’ll have a flat lie, a view of the entire green, and a full swing. This is why you will see Bowling Green Golf Club members with hybrids and fairway woods on the 1st tee.
HOLE 4
You’re standing at the 4th Hole ready to tee off and your first thought is that you’re forced to lay-up on the peninsula across the pond because the hole doglegs left. This leaves you 215 yards to a raised green with a large bunker in front. Local knowledge about the 4th Hole is that beyond the mound and rough up the right side is a large hidden portion of the fairway. With a hybrid or fairway wood in hand play to the fairway, short and right of the green. It provides a relatively easy pitch up the hill to all sections of the green and a great chance at par or bogey.
This hole is the most misunderstood on the course and the one most likely to cause you to rack up a big number. Deceptively, it is the shortest Par 5 on the course; however, as Local knowledge dictates Your best bet is to the play the hole as three Par 3s:
- First shot, locate the yardage markers on the tee box and play that distance to the corner of the dogleg.
- Second shot, locate a sprinkler head with yardage marked to the green and subtract 100. Then lay up to that distance and your third shot will be positioned at the 100 yard marker
- Third shot, hit from the 100-yard marker and mentally add 5 yards for the elevated green.
A birdie will be in your sights and racking up those big numbers on the 4th hole will no longer be an issue!
HOLE 6
Hole 6 is the first of several challenging Par 4s that you’ll encounter during your round. The dogleg right is guarded on the right by a fairway bunker and on the left by a large white pine. The fairway plays 301 yards from the red tees and 428 yards from the championship black tees.
You’ve hit from the tee and now you must decide how to tackle the daunting looking second shot. Here’s how:
- Notice that while the green sits up slightly there’s a fairly large, flattish apron fronting the green.
- A lower trajectory shot that lands in this apron will bounce forward onto the green.
- Take a longer club and play a low, controlled shot landing in the apron and watch it hop onto the green!
HOLE 7
The 7th Hole is the #1 handicap hole for men on the Bowling Green golf course and rightly so. With a slight dogleg left that is lined on both sides by majestic red pines and black tees that measure in at 434 yards (256-yard fairway leaving 178 yards to center green) it is sure to intimidate. Add to that two steep fairway bunkers on either side of the dogleg bend and you may be left scratching your head on how to execute your approach.
Unless you are sure you can carry the ball 265+ yards with a high draw, take aim at the left fairway bunker and lay up to it. The closer you get to the bunker, the shorter your next shot will play. Give it a try and see if par is the cards for you.
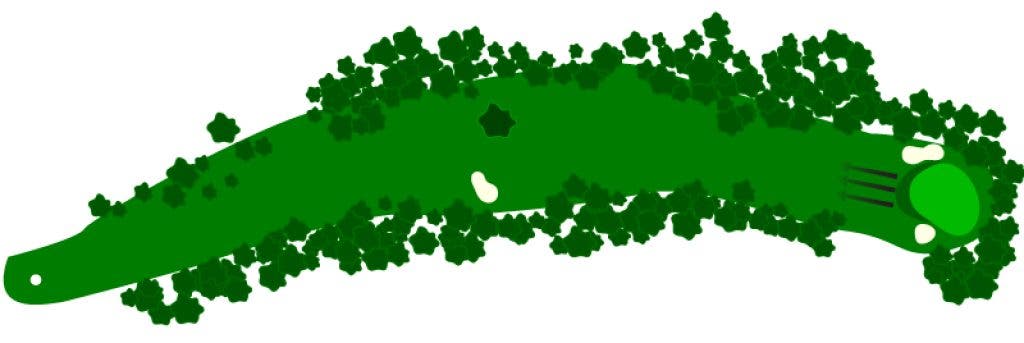
HOLE 9
Hole 9 is a shortish Par 5 with an unusually shaped green. This last hole of the front nine is the definition of a “sucker pin” inviting you to take a dangerous or unnecessarily risky shot. If the hole location is in the back right portion of the green beware because the approach shot will be difficult. A gaping bunker and mound protect the pin. If this is the situation for you, play safe and smart to the back center of the green and putt up the hill.
This hole rewards the patient golfer while punishing the aggressive. Though it’s sometimes hard, being patient and playing smart can save you strokes!
If you are a member or frequent golfer at Bowling Green and have some Local Knowledge tips you would like to share let your fellow golfers know in the comments!