Health & Fitness
Chocolate Covered St. Patrick's Day O'reos
Chocolate covered Oreos for St.Patrick's Day will make you say "O'Yum" and that's no blarney!


"O'Yum!"
Is starting off a post with a pun ever a good thing to do? I don't know, but what I do know is that chocolate covered Oreos are becoming a big thing and they are the easiest treat I have ever made.
I first found a mold for this use a couple years ago. I had to ask what it was for since it seemed very deep for chocolate use alone, even with a filling. These molds are made just for this purpose and usually have a decorative pattern in the bottom of the mold which will become the top of the cookie when it's finished.
Find out what's happening in Rancho Santa Margaritafor free with the latest updates from Patch.
I used a mold with a shamrock pattern. (see photos)
Here's what you'll need:
A Decorative Oreo Mold—Found in cake decorating stores and from online sources. Links provided below.
A bag of Double Stuff Oreos—If you buy the cookies a few days before making these, make sure you save enough to actually make your project. Don't ask me how I know this, but I do. Trust me.
A bag of Confectionary Chocolate or Colored Candy Coating—Found in any cake decorating supply store or where Wilton products are sold. If you are using more than one color, for example, a green shamrock and chocolate to cover, you will need more than one bag. Also if you are making a lot of covered cookies, buy accordingly.
Find out what's happening in Rancho Santa Margaritafor free with the latest updates from Patch.
Luster Powders—Optional, for added decorations. Found in the same places as mentioned above.
How To Make Chocolate Covered Oreos:
1. Melt chocolate and stir until smooth. If you are 'coloring' the design with something other than regular chocolate, for example, you want a green shamrock, paint the cookie mold design and let it harden then go on to step #2.
2. Fill the individual cups 3/4 full with melted chocolate. White chocolate makes some pretty cookies too.
3. Drop in an Oreo in each chocolately-good space. They are now the happiest cookies on the face of the planet.
4. Push down on the top of the cookie. The chocolate will wrap itself over the top and envelop the cookie. If the cookie isn't completely covered, spoon enough chocolate over the cookie so it is completely sealed in chocolate.
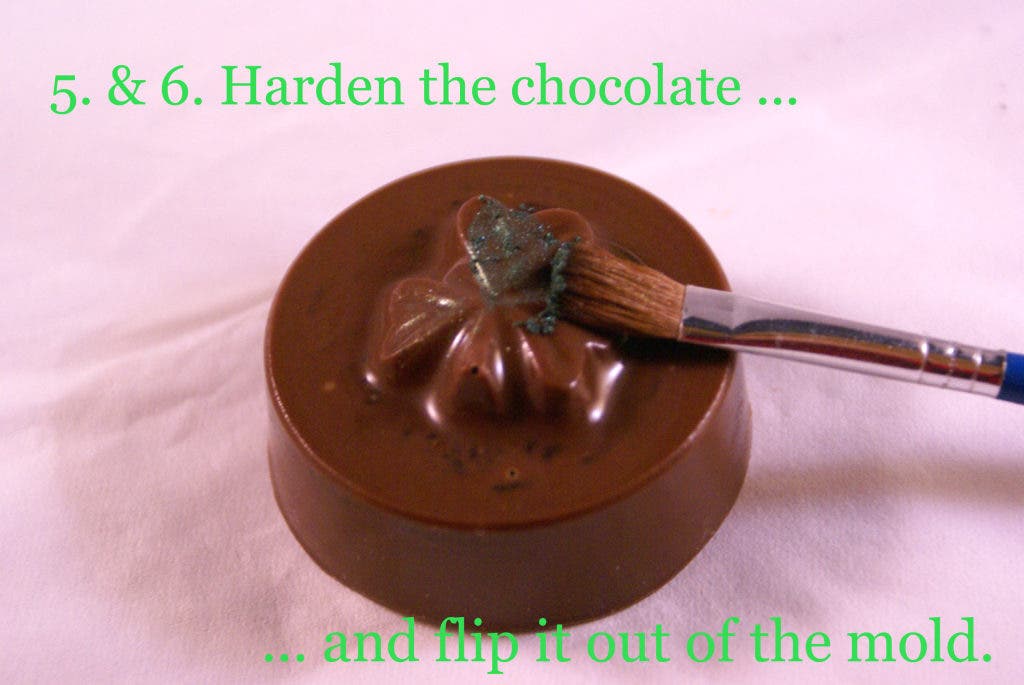
5. Place in the refrigerator about 10 minutes to harden.
6. Take the mold out of the refridgerator and flip the cookies out. If they don't come out easily, they need to set more. Return them to the refrigerator awhile longer. There is no time limit on keeping them cold.
Now comes the fun part!
Instead of painting my shamrock with green candy coating 'chocolate' before I added the cookie to the mold, I decided for my added decoration to the shamrock design to use a rich iridescent mallard green luster dust to give it a different look. I then brushed a dusting of sparkly gold luster powder over the entire cookie.
To give as gifts, place each cookie in a cupcake wrapper and place in a small cello bag. Tie off with ribbon. Or, download the free printable bag topper to attach to the cello bag ... or there are even little plastic boxes available at the cake decorating stores made especially for decorated Oreo cookies.
See? I told you they were very easy to make. If you make some please upload your photos here to share with us.
Sources for
Molds:
Calico Cake Shop - Buena Park
ABC Cakes - Orange
Fancy Flours (online) - huge assortment for all occassions
Other Packaging Ideas and Free Downloads: