Neighbor News
Nose Piercing Placement: The Anatomy-First Pro Guide
Anatomy-first nose piercing placement considers tissue thickness, alar crease, nose shape, and facial proportions for balanced healing.

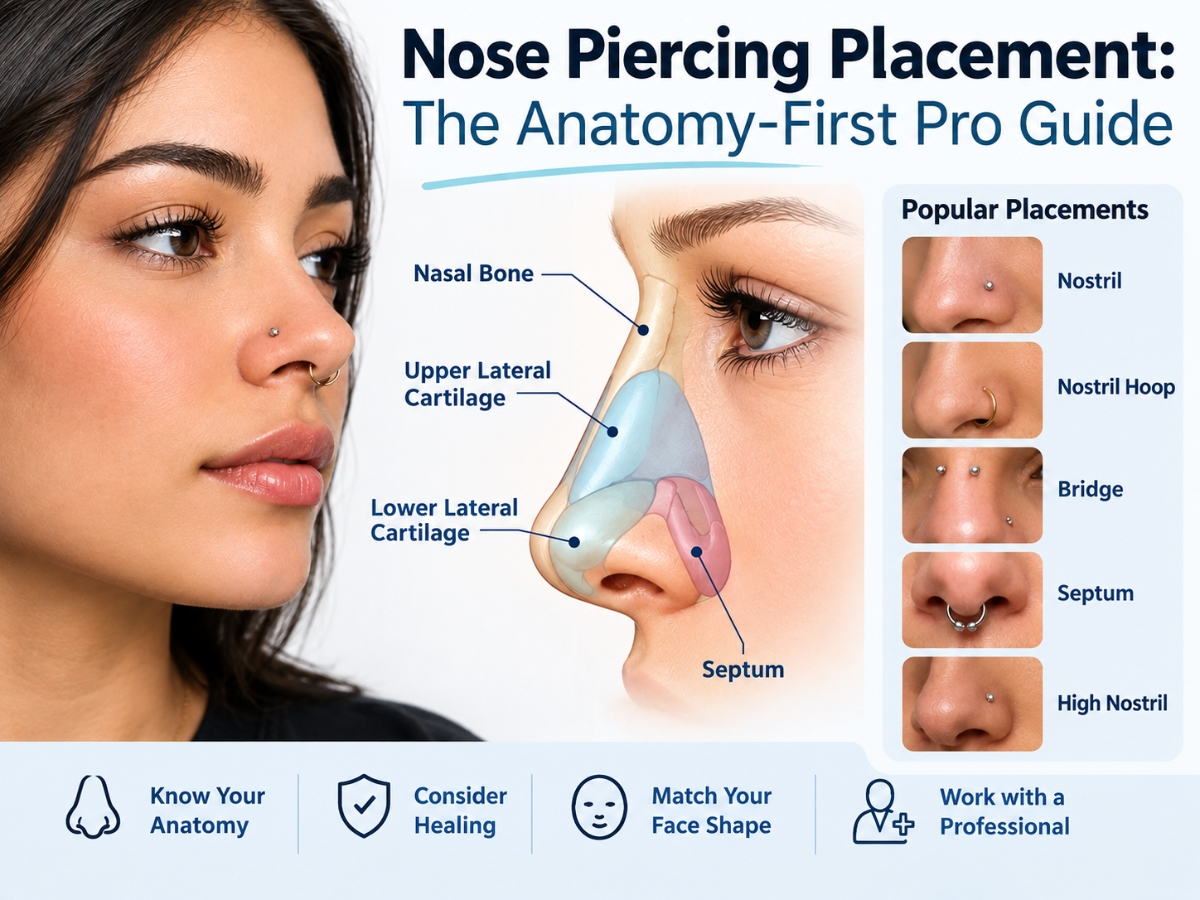
Proper nose piercing placement depends on three anatomy factors: the alar crease, the tissue thickness of the nose wing, and the client's facial proportions. For most clients, the perfect nose piercing position sits 1 to 2 mm below the alar crease at the mid-point of the nostril wall, adjusted for nose shape and planned jewelry style. Getting these millimeters right separates a piercing that heals cleanly from one that causes persistent complications.
Why Placement Is the Most Important Decision in a Nose Piercing
Most placement mistakes happen before the needle enters. Nose piercing placement is not just an aesthetic choice; it determines healing time, jewelry compatibility, and whether the piercing remains comfortable long-term. A mark set even two or three millimeters off can produce an asymmetrical healed result, unwanted pressure on cartilage, or slow migration over months.
How Millimeters Change the Healed Result
The nostril wall is a narrow strip of tissue. Too low and the jewelry sits on thinner skin near the nostril rim, increasing migration risk. Too high and you enter denser cartilage territory, extending healing and limiting jewelry options. The crease itself, while it feels like the natural spot to many clients, creates a fold that traps moisture and makes cleaning difficult throughout the healing period.
Find out what's happening in East Brunswickfor free with the latest updates from Patch.
What Proper Nose Piercing Placement Means in Practice
Proper nose piercing placement means the entry point is in tissue thick enough to support the jewelry without tension, positioned so the jewelry rests flush, and marked with the healed position in mind. Swelling shifts apparent position by 1 to 3 mm in the first weeks, and experienced piercers account for this before committing to any mark. Piercers who want consistent placement control rely on single-use, gauge-specific body piercing needles that deliver a clean, predictable bevel angle from the first millimeter of entry through to jewelry transfer.
The Anatomy You Need to Assess Before Marking
Before any mark goes on the skin, a two-minute anatomy assessment prevents the majority of placement errors that lead to client callbacks.
Find out what's happening in East Brunswickfor free with the latest updates from Patch.
The Alar Crease: Your Primary Reference Point
The alar crease is the fold where the nose wing meets the face and the most reliable landmark for nostril placement. Standard placement sits just below this crease, not inside it, where tissue transitions from the thicker nose wing to the thinner nostril floor. Palpating the crease before marking confirms tissue depth at that exact point and checks for irregularities that might cause the needle to track off-course.
Tissue Thickness and What It Means for Depth
Clients with thicker, fleshier noses have more tissue to work with and more room for placement adjustment. Clients with thinner nostrils have a narrower window; the margin between correct tissue and the nostril rim is smaller, so precision matters more. Feeling the tissue from inside and outside the nostril before marking confirms whether the tissue at the marked point can support the gauge being used.
Nose Shape Considerations
Nose shape changes where the alar crease sits and how much usable tissue lies below it. On a narrow nose, placement should sit more anterior to avoid the jewelry appearing too close to the face. On a wide nose, a slightly more lateral position still reads as balanced. An upturned nose has a shorter nostril wall below the crease, so correct placement may sit higher than expected. A downturned nose offers more tissue depth but also more risk of placing too low.
Placement by Nose Type: Decision Framework
| Nose Type | Ideal Placement Zone | Best Starter Jewelry | Key Consideration |
| Narrow | Anterior, just below crease | Flat-back labret, small end | Avoid placement too close to face center |
| Wide | Mid-nostril wall, slightly lateral | Labret or small hoop | More surface area; larger ends work |
| Upturned | Higher on nostril wall, short tissue window | Flat-back labret only | Limited depth; confirm tissue supports gauge |
| Downturned | Below crease with more depth available | Labret or curved stud | Risk of placing too low; stay above rim |
| Deviated | Assess each side independently | Labret | Mark both sides before committing |
Physical assessment always overrides category assumptions. Clients with deviated anatomy usually have a workable position on both sides once each nostril is assessed independently.
Standard vs. High Nostril Placement: When to Choose Which
Standard Nostril: The Classic Position and Its Variations
Standard nostril placement sits below the alar crease in the mid-zone of the nostril wall. Posterior placement suits clients who want the jewelry to sit snug against the skin; anterior placement suits clients who prefer a more visible profile or plan to wear a hoop. The standard position works across almost all nose types and heals in 3 to 6 months, making it the default starting point for any client who has not specifically requested a high nostril.
High Nostril: Anatomy Requirements and What Changes
The high nostril sits in the upper third of the nose wing, above the standard position and closer to firmer cartilage. It requires more tissue depth, takes longer to heal at 6 to 9 months, and limits starter jewelry to flat-back labrets only. Not all anatomy supports this placement; noses with a short upper wing or pronounced bridge crease may not have enough usable tissue. Assessing suitability before marking is essential, and the conversation should happen at consultation, not after the mark is on.
Planning for Multiple Piercings from the First Session
Clients building toward stacked placements need their first piercing marked with the full composition in mind. Mark both proposed positions before piercing the first one, even if only one is being done that day, so the tissue window for the second placement is preserved and the client can see the complete plan before committing.
Needle Gauge, Angle, and How They Affect Placement Precision
Why 18G vs. 16G Changes the Placement Decision
Most standard nostril piercings are performed at 18G. The finer gauge allows precise entry through thin nostril tissue and suits the majority of starter jewelry. A 16G needle suits clients with thicker tissue or those who plan to wear both gauges long-term; the larger initial channel heals without collapsing. Going wider than 16G on a standard nostril requires confirming the marked tissue is thick enough to support that gauge without tension on the healing channel.
Bevel Angle and Tissue Entry: What Pro Piercers Know
The bevel needs to face in the direction that pulls tissue least during entry. On a standard nostril, the bevel faces downward so the cutting edge opens the tissue cleanly rather than dragging it. Holding the needle perpendicular to the skin at the marked point keeps the channel straight and prevents the jewelry from sitting at an unintended angle once inserted. Piercers who stock purpose-built body piercing needles from a professional supplier get consistent bevel geometry on every unit, removing one variable from an already precision-dependent process.
The Marking Process: Getting Placement Right Before the Needle Enters
How to Mark Correctly and What the Client Should Confirm
Mark the placement with the client seated upright and facing forward in natural light. Use a surgical skin marker dot no wider than 1 mm to preserve entry-point precision. Show the client the mark from both the front and the side before they confirm. Many clients check only the front view; the side profile often reveals the mark sits further back or forward than expected, which is far more useful to know before piercing than after.
Red Flags That Mean Restarting the Mark
If the client tilts their head during mirror confirmation and the mark shifts significantly, their head was not neutral during marking; restart in the correct position. If the mark sits inside a visible skin fold when the client's face is relaxed, move it out of the fold to prevent moisture trapping during healing. If pressing gently on the marked spot from outside reveals thinner tissue than expected, reassess gauge before the session proceeds.
Nose piercing placement is where the outcome of every session is secured or compromised. Anatomy assessment, correct reference to the alar crease, and matching the mark to nose shape and jewelry style produce a result the client remains satisfied with long after healing. The tools used at the moment of piercing matter just as much as the mark. Explore professional needle options at Obsidian Needles and stock your studio accordingly.